Thursday, May 26, 2011

Rainbow Cookies!

I know St Patrick's Day was months ago......but I'll still share about the fabulous rainbow cookies we made.   I remember making these as a little kid, but I haven't made them for years. This year, I remembered about them, and made them as our treat for St Patty's Day.

First, you follow an awesome snicker doodle recipe. I use my mum's. It calls for cream of tartar, which for some reason makes it better than all the other recipes that don't.

Mix:
1 cup shortening
1 1/2 cups sugar
2 eggs

then Mix:
2 3/4 cups flour
2 tsp cream of tartar
1 tsp baking soda
1/2 tsp salt

Instead of just rolling little dough balls in cinnamon and sugar, divide all of the dough into several sections on wax paper. Put a few drops of food coloring in each section, and mash it in with your hands til you have several little colored mounds.

Next, take a little pinch of each color to make a mini dough ball.
After you make your dough ball, roll it in a little cinnamon and sugar, and place on a baking sheet.

bake @ 400 degrees
8-10 minutes


Don't they look so yummmy! Husband loved them. I took them to school on St Patty's, and my ESL kids gave me a look like "you want us to eat cookies that look like play-doh?". The brave ones each tried a rainbow cookie, realized they were delicious, and came back for seconds. They were a big success.

Skirt Attempt Numero Dos

I attempted to help my friend make a skirt one Sunday afternoon. We used this tutorial from Susan Petersen's freshlypicked blog.  I've made a few skirts using this tutorial, but somehow I forgot that I like my skirts better when I cut the skirt a few inches slimmer than what the tutorial suggests. That gross error resulted in a skirt that was very cute, but quite a bit puffy and drowning. Since we were not going for the prego look prematurely, we decided to re-work the skirt. 
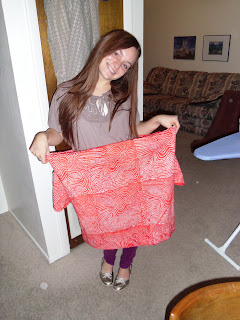
Here's the before alterations pic. 
Of course she looks darling in everything, 
and you can't tell so well in the pic,
 but the skirt really was quite a bit too large. 

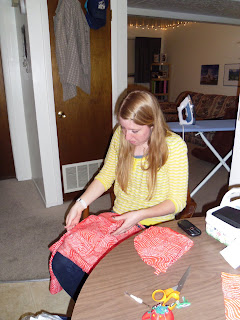
So we unpicked the waist band...

Holy mama check out all that material!

One side was cut down slimmer by about 14 inches. Yikes. 

The pocket of the trimmed side was re-pinned in place...

and re-sewn.


Check out how much we trimmed down on this skirt!

Ta da!
Now we have a super cute girl in a super cute skirt!
THAT was the plan the whole time.
It just took us 2 tries to achieve success.


So the moral of this story is:
Don't give up on your sewing projects if they don't turn out quite right.
It only took us another hour to make a semi cute skirt
into a smokin hot skirt:)

Friday, April 1, 2011

my crafty "to do" list....

yoga skirt
ruffle shirt
felt flowers

I feel like these are all very do-able projects. Knowing me, I'll probably cut some corners and make some of my own adjustments, usually because I'm lazy, or because I try to make material and stuff I already have just work. Hopefully they will turn out. Now I just need some time to craft. This week I've been using husband's homework time for my craft time. I hate crafting by myself. It's so much better to do it with husband around....so he can tell me how crafty I am:)

Friday, March 25, 2011

dish washing solution

There are only 2 of us living in our apartment, yet somehow, the sink is always full of dirty cups. For whatever reason, husband and I just get out a new cup every time we get a drink. Sometimes we try to strategically place our cups so that we'll remember which one is ours, to be able to just use it again, but I always forget, or get mixed up, and then just give up and get out another cup. Enough is enough.

Enter: crafty solution

One particularly crafty evening, while husband was doing lots and lots of boring homework, I decided to stop the cup madness. I got out some cute paper I had under my bed, cut it out into circles a little bigger than our cups, and wrote our names on them. Then I covered each paper circle, top and bottom, with clear packing tape.


our new happy little coasters


Ta da! No more cup confusion. This crafty solution has been awesome. We've been using it now for a few weeks, and the cup pile-up has ended. Someday I might upgrade our little paper/plastic coasters, but for now, it was a quick and happy solution.

freeze chuck

This was my first attempt at a freeze paper painted shirt. I've seen very fun possibilities with this crafty skill, so I am trying develop this talent. This particular shirt was done for Blaine. Since he's been a roommate of little brother for so long, Blaine is practically family. I know the boy loves Chuck Norris, so, this is what I came up with.

First, I found this image of Chuck Norris on the internet and printed it out on regular printer paper. Then I taped it to some freezer paper and cut out the image with an exacto knife. It was a little tricky, but I think he turned out all right, and you can definitely still tell it is Chuck. I bought the navy blue tshirt at DI for $1. After washing it (cuz it's from DI of course) I ironed the freezer paper on to the shirt. The paper has to be ironed with the shiny side down, and only use dry heat with the iron. 


 Next came the paint application. I'm gonna have to find out a better source for fabric paint. This particular yellow came from my mum's laundry room...and I'm pretty sure we bought it in the early 90's. I've heard you can get a medium to mix with acrilic paint, so that you can just use acrilic to paint with...which would be a pretty cheap option. I'll investigate that further for next time.


After a few coats of yellow paint, with some help from the hairdryer to speed up the drying process, I carefully peeled off the white freezer paper.


Ta da! A new birthday shirt to give to birthday boy Blaine.